In this article, I’m going to show you how an asset request is made in ServiceNow, and then we’ll go over the request form.
In this article you’ll learn:
-
How to make an asset request
-
What the process flow of an asset request looks like
In today’s example, I’m going to make a request for an Asus laptop.
Please note, asset requests are typically made by end-users through the service catalog. Most organizations will have a Service Portal setup that all employees can access and make requests for hardware assets from.
Creating a Request
The first thing you’ll want to do is open up ServiceNow, and in the application navigator type in “Requests”.

From here, click on the “Requests” module under the “Service Catalog” application. A list containing all out-of-the-box requests will now appear. Click on the “New” button.
You’ll now see the Service Catalog. Here in the Service Catalog, you can make requests from any of the categories displayed.

In today’s example, I’m going to click on “Hardware”, since I’m requesting a laptop.
On this page, you can see all of the hardware assets that are available to select from. I’m going to select the “Asus G Series Notebook”.
Please note, all of the information displayed here in the Service Catalog for this item can be edited in the related Hardware Model record, under the “Product Catalog” tab.
You’ll notice on the right-hand side of the screen, there is an “Order this item” widget. From this widget, you can see the price of the item, adjust the quantity you’re requesting, view the delivery time, and select either order the item now, or add it to your cart.

Adding items to your cart is good if you’re wanting to request several items within one request. In today’s example, I’m just going to click “Order Now” as the laptop is the only item I need.
You’ll now be redirected to this order status page.
On this page you can view:
-
When the order was placed
-
The request number
-
The estimated delivery date
-
The item requested
-
And the current stage of the request
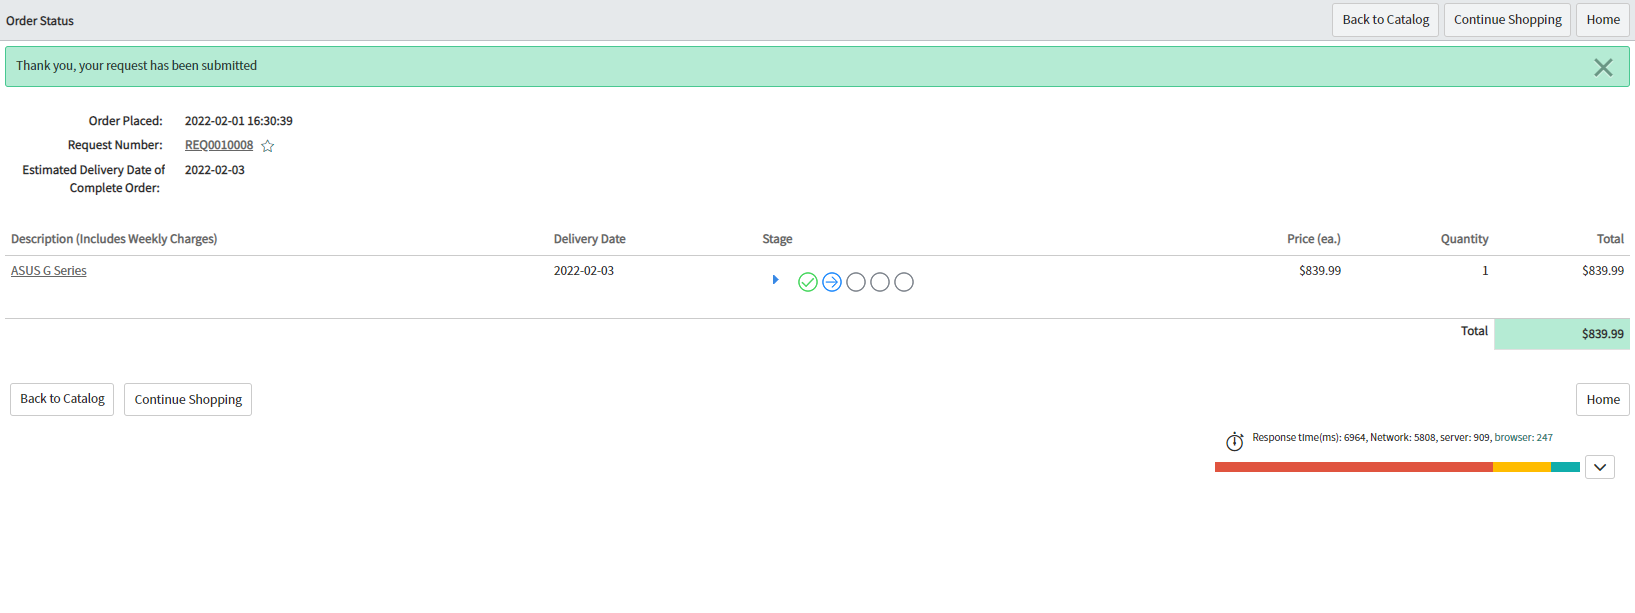
As you can see, this particular request is already in the “Fulfillment” stage, and the “Waiting for Approval” stage has already been completed.
The reason why this request has already been approved is that the workflow automatically approves item requests that have a total cost of less than $1000. For requests that have a total cost greater than $1000, approval is required before moving to the “Fulfillment” stage.
Now, let’s take a look at the request record in the “Requests” module
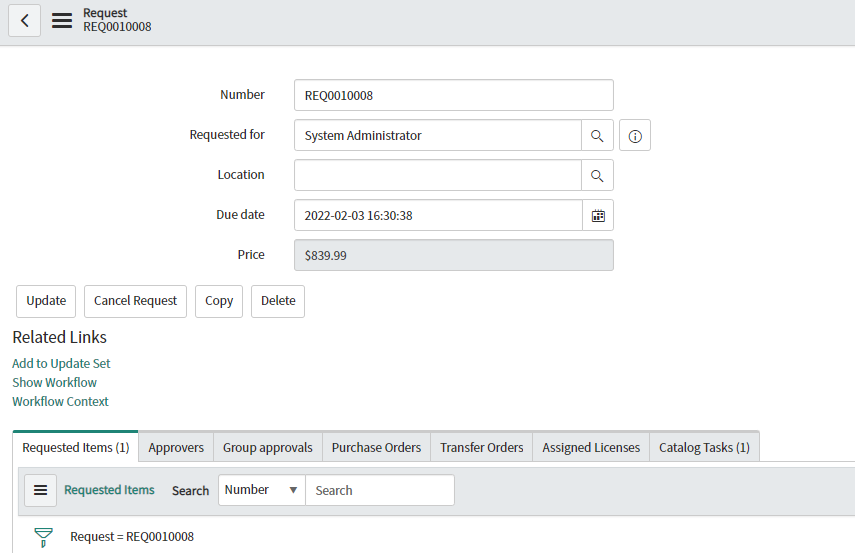
On the request form, we have the following fields:
|
Field |
Description |
|
Number |
Field that stores the system generated request number. |
|
Requested for |
This is the individual who the request is for. |
|
Location |
This field displays the physical location of the individual who made the request. |
|
Due date |
This is the date in which the request should be completed by. |
|
Price |
This field is used to display the total price of the request. Notice that this field is read only as the value in this field is automatically generated by the system. |
|
Opened |
The date and time in which the request was opened. |
|
Opened by |
Field that displays the name of the individual who opened the request. |
|
Approval |
This dropdown field displays if the request has been approved, not yet requested, requested, or rejected. This field is automatically controlled by the system, so when a request is approved or rejected, the value is automatically set. |
|
Request state |
The system automatically sets the state of the request. This field displays all of the possible states you could set for a request. This field contains the following options:
|
|
Sourced |
This read only checkbox field indicates if the request has been sourced yet. Sourcing is when the items requested have either been added to a purchase order, or they’ve been added to a transfer order to have them transferred to a local stockroom. This field is automatically checked by the system when the items associated with this request have been sourced. |
From the request form, you can also click on the “Cancel Request” button if you wish to cancel this request.
Now that we’ve covered the fields on this form, let’s take a look at the related lists.
In the first related list “Requested Items”, this related list shows you each individual item that has been requested. In this instance, since we only requested one item, there’s only one listed here. But if I made a request for multiple items, we’d see multiple records displayed in this list.

Please note, every item requested within an item request in ServiceNow has its own lifecycle. This means, if a request was made for multiple items, some of the items could be rejected, and some of them could be approved. This allows organizations to easily approve and reject specific items, without having to approve or reject the overall request.
Next, we have “Approvers”, in this tab you can see all approvers for the request. Since this laptop didn’t require approval because its total price was less than $1000, there are no approvers. If the request did require an approver, then you would see their names in this list, with their decision.
In the next tab “Group approvals”, this related list displays all approvals that have been made to one or more groups. This is very similar to the previous tab, but the approvals here are at the group level, not the individual level.
Next, we have “Purchase orders”, this related list automatically displays all related purchase orders for this request. In the next lecture, we’re going to create a purchase order, so you’ll see this tab populated with the purchase order we’ll be creating shortly.
In the next tab “Transfer orders”, this related list automatically displays all related transfer orders for this request. Transfer orders are made when you have the requested items in stock, but you need to transfer them from one stockroom to another. When sourcing the items for a request, you can either source assets via a transfer order, create a purchase order or both.
Next, we have “Assigned Licenses”, in this tab you can assign software licenses to this item request. Since this request is just for a laptop, I’m not going to add a software license to this request. But if this request was for a software license, you can easily add a software license by clicking on the “New” button.
And last but not least, we have “Catalog Tasks”. In this related list, you can view all related catalog tasks for this request.
You’ll notice that we have a “Source Request Items” task in the list. This task is automatically generated for a request when items need to be sourced. This task is typically completed by the procurement manager.

Please note, only requests that contain an item that was published from a hardware model or consumable model can be sourced within a request. That means if you have a generic item called “Developer Laptop” for example, and the item doesn’t tie to hardware or consumable model in the system, then you can’t source the item through the system workflow. You will need to source the item manually.
Since this Asus laptop we requested is linked to a hardware model in the system, we’re able to source this particular request.
Before we wrap up this article, let’s take a quick look at the Source Request form. If we go into the source request task and then click on the “Source Request” button located along the top right of the form header, you’ll then be navigated to this “Source Request” form.

From this form, you can add the requested item to a transfer order, create a purchase order, or add the item to an existing purchase order by clicking on the “Consolidate PO Line with open POs” checkbox.
About Everforth GlideFast
Everforth GlideFast is a ServiceNow Elite Partner and professional services firm that provides tailored solutions and professional services for ServiceNow implementations, integrations, managed support services, application development, and training. Reach out to our team here.