In this article, I’m going to show you how to create a hardware asset disposal order in ServiceNow.
In this article you’ll learn:
-
What a disposal order is
-
How to create and process a disposal order
Before we look at how to create a disposal order in ServiceNow, I want to cover what a disposal order is, and why using ServiceNow to record all of your hardware asset disposals is important within your IT Asset Management practice.
Asset Disposition Explained
Asset disposition is the final stage within the hardware asset management lifecycle. Within this stage, hardware assets that are either no longer functional, have been fully depreciated, or no longer provide any value to an organization are disposed of.
The asset disposal process follows a strict standard to ensure that organizations properly dispose of their assets securely and safely, ensuring that sensitive data does not leave the organization and that all devices are properly disposed of and recycled correctly.
Typically, the following steps will take place when asset disposal takes place within an organization:
-
Assets are identified for disposal
-
Assets are then placed in a stockroom or storage facility
-
Asset tags are removed
-
Software is removed and the associated entitlements are reclaimed
-
Hard drives are removed, degaussed, and crushed
-
Assets are collected by the ITAD vendor
-
The ITAD vendor disposes of the assets and provides a certificate of disposal
Now that we’ve covered what disposal is, let’s go into the system and create a hardware asset disposal order.
Please note, since this feature is part of the HAM Pro licensable application from ServiceNow, you’ll need this plugin activated from ServiceNow in order to use this feature.
Creating a Disposal Order
The first thing you’ll want to do is open up ServiceNow, go into the application navigator, and type in “Disposal Orders”.

From here, click on the “Disposal Orders” module under the “Disposal Orders” application. A list displaying all out-of-the-box disposal order records will now appear. Click on the “New” button. A blank Hardware Disposal Order form will load.

On the disposal order form, we have the following fields:
|
Field |
Description |
|
Number |
Field that stores the system generated request number. |
|
Stockroom |
Field used for defining what stockroom the assets that you’re disposing of are located in. |
|
Location |
The field is automatically populated with the location record that is associated with the stockroom selected in the stockroom field. |
|
Assigned to |
The individual who will be managing and handling the disposal order. |
|
Stage |
The system automatically sets the stage of the disposal order. This field displays all of the possible stages you could have for the disposal order. This field contains the following options:
|
|
Vendor |
The IT Asset Disposition (ITAD) vendor who will be processing the disposal. |
Right-click on the form header and save this disposal order. You’ll notice that we have some new fields, a new form section, and even some related lists. Let’s take a look at these:
-
Vendor order ID - This is the unique disposal reference number that your ITAD vendor will provide to you when they process this disposal order.
-
Certificate of disposal - This yes/no field allows you to indicate if you’ve received a certificate of disposal for this disposal from your ITAD vendor.
-
Scheduled date - This field allows you to enter the date on which the ITAD vendor is scheduled to collect the assets from you.
-
Pickup contact name - This field allows you to capture the name of the individual that will be collecting the assets from the ITAD vendor.
-
Pickup details - This field allows you to enter pickup details
-
Additional info - In this field you can enter any additional information relating to this disposal.

In the related lists section of the form, we have “Planned Assets”. In this related list, you can click on the “Edit” button and select assets to add to this disposal order.
In the next related list “Hardware Disposal Tasks”. In this related list, you can view and work on tasks relating to this disposal. Please note, throughout the workflow of a disposal order, the system will automatically create tasks and populate them into this related list.
In the final related list “Disposed Assets”, this list will display all of the assets that have been disposed of, when this disposal order reaches the final stage of “Completed”.

Now that we’ve covered the form and its related lists. Let’s move on to the next stage, selecting the assets to dispose of. To do this, click on the “Edit” button in the “Planned Assets” related list.
You’ll now be directed to this collection box view where you can select the assets you wish to dispose of. You can see that several filters are being applied so that assets have a state of “In Stock”, and a substate of “Pending disposal”.

Please note, these filters are applied to ensure you only select hardware assets that are truly pending disposal. But if you forget to change the sub-state of the assets that you’re disposing of, then you can remove the filter to find them.
Now I’m going to select all of the assets and move them across into the selected box on the right. Now click on the “Save” button. You can now see in the “Hardware Disposal Tasks” related list we have a new task to verify the assets planned for disposal. Open this task.

In the hardware asset disposal process, this task is to ensure that you’ve verified these are the assets you’re really wanting to dispose of. Once you’re certain these are the correct assets, go into the planned assets list below, select all of the assets, click onto the actions menu, and select “Verify”.

Now that we’ve verified these assets, you can close this task by changing the state to “Closed Complete” and clicking on the update button.
As you can see, the stage of the disposal order has now changed to “Scheduling”, and a new task has been created for providing the vendor, vendor order ID, scheduled date, and pickup contact name. Since we already filled in this information on the disposal order, we can close this task as “Closed complete”.

Yodepartingu’ll see that the stage of the disposal order is now set to “Transit”, and a new task for selecting the assets departuring for disposal has been created. Click on this task to open it. In this task, when the ITAD vendor takes the assets away from us for disposal, we need to mark all of those assets as departed by selecting “Depart” in the actions menu.
Please note, when we mark assets as departed, any allocations associated with them will be retired, and they will also be removed from any contracts they’re on. Since I know that all of these assets were just taken away by the ITAD vendor, I’m going to select “Depart” for all of them.

Now let’s close this task. As you can see, the stage of this disposal order has changed to “Confirmation”, and a new task has been created for confirmation from the vendor. Open up this task.
This task is created to ensure that you receive a confirmation from the vendor confirming that they’ve received and disposed of the assets you gave them. This step in the ITAD process is very important as it ensures you have an audit trail with a clear chain of custody from you to the ITAD vendor. Typically you’ll receive an email from the ITAD vendor confirming that they’ve disposed of the assets, and they’ll also attach a disposal report and/or data destruction certificate that will include all destruction details for all assets and their serial numbers.
Now let’s close this task. As you can see, the stage has now been set to “Documentation”, and a task has been created for attaching the disposal report and data destruction certificate. Open this task.

In this task, you’ll want to attach a copy of the disposal report and/or data destruction report as an attachment. In this example, I’m going to upload a blank PDF document. You will also need to set the “Certificate of disposal” field to “Yes”. For the final step of this task, we also need to select all of the below assets and mark them off as disposed of by clicking the “Dispose” action.
You can see that all of the associated assets have been set to the state of “Retired” and substate of “Disposed”. Close this task.
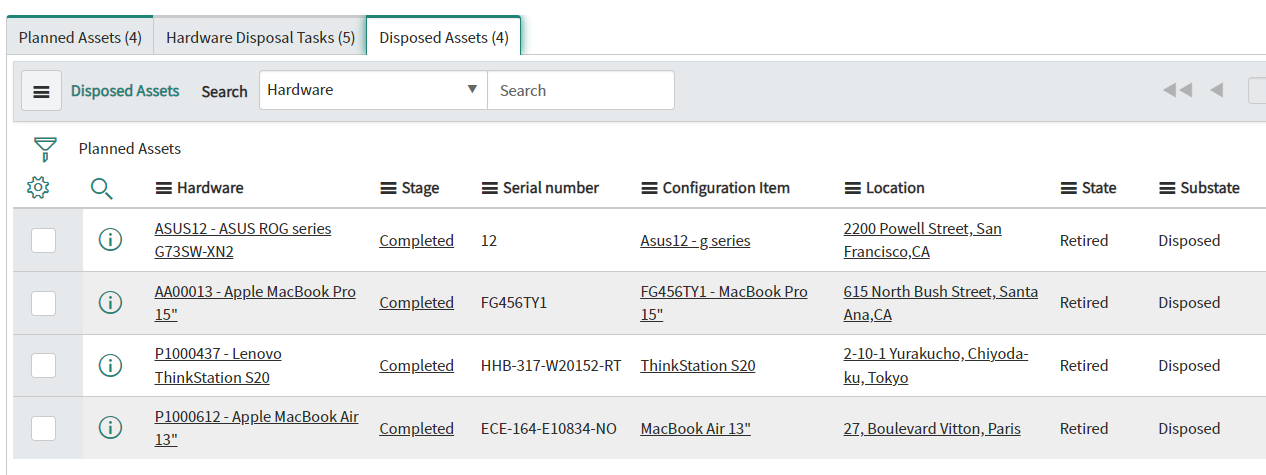
As you can now see, the stage of this disposal has been set to “Completed”.
Be on the lookout for more ServiceNow tips and tricks from Everforth GlideFast!
About Everforth GlideFast
Everforth GlideFast is a ServiceNow Elite Partner and professional services firm that provides tailored solutions and professional services for ServiceNow implementations, integrations, managed support services, application development, and training. Reach out to our team here.